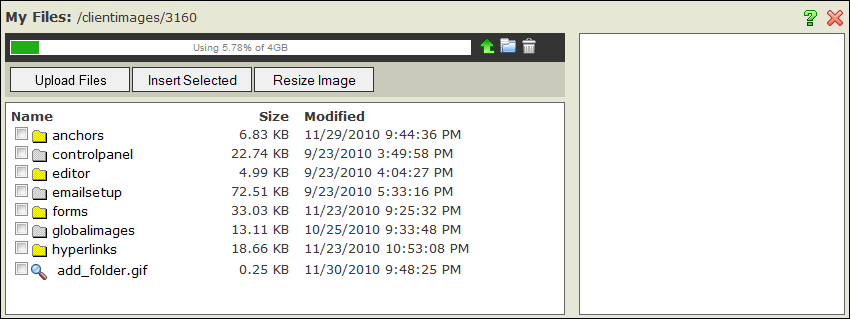
My Files
The My Files area is where you will manage your files such as pictures, multimedia and other documents. These can be stored in one location, in multiple levels of folders and with delete and add capabilities for multiple records.
Who has access:
You must have one of the checked permissions to use this manager.
Guest
Member
Contributor
Editor
Administrator
Group Contributor
Note: You must be a Site-Wide Editor or Group Editor to delete files or folders. Site-Wide and Group Contributors can only add images and folders.

 |
Opens the Help Manual. |
 |
Closes the My Files dialog box. |
 |
Opens the file selection dialog window. Browse your computer and find the file or files you want to upload. To select multiple files, hold down the Ctrl key and click each file you wish to upload (On a Mac, hold the Command/Apple key). The Ctrl key combined with mouse click selects files that are not adjacent to one another in the list. To select a group of consecutive files use the the Shift key in combination with mouse clicks. Hold shift and click the first file in the group. While continuing to hold the Shift key, move to the last file in the group and click again. |
 |
Inserts the selected image's properties into the Insert/Edit Image dialog box. |
 |
Allows you to change the height and width of your image with the goal in mind of reducing the image file size. See the Resizing Images section for detailed information. |
 |
Navigates to the next folder up from your current folder location. |
 |
Adds a new folder to the My Files area. |
 |
Removes selected folders and/or files from your current folder location. |
| Name: |
The folder or file name. |
 |
Folder in which other folders and files are stored. |
 |
Displays the file usage report. |
| Size: |
Displays the total size of the folder or file. |
| Modified: |
Displays the date and time the folder and/or file were modified. |
You can create as many folders and as many folders within folders as you need.
- Select the Add Folder
 icon.
icon.
- Enter a name for your new folder and hit OK.
- Select the folder or folders you wish to delete by clicking the box to the left of the folder name.
- Select the Delete Selected Folders or Files
 icon.
icon.
- Click "Ok" when presented with the Warning dialog box.
WARNING: All selected folders will be deleted. You will need to remove all references to the deleted file or files in this folder from your Website.
- To select a folder, click the folder's name.
- To return to the previous location, select the Up One Folder
 icon.
icon.
To preview a file, click the file name and it will appear in the preview window to the right of your file information.
- Select the file or files you wish to delete by clicking the box to the left of the file name.
- Select the Delete Selected Folders or Files
 icon.
icon.
- Click "Ok" when presented with the Warning dialog box.
WARNING: All selected files will be deleted. You will need to remove all references to the deleted file or files from your Website.
Note: Please follow all copyright laws. You are responsible for the images on your site.
