Insert/Edit Images: Quick Links
Insert/Edit Images
The Insert/Edit Image icon allows you to select an image or file to insert into your Website.
Who has access:
You must have one of the checked permissions to use this manager.
Guest
Member
Contributor
Editor
Administrator
Group Contributor
 Place your cursor in the desired location within your editor window in which to add your image.
- Click the Insert/Edit Image icon to bring up the Image Properties dialog box.
- Click the My Files button located to the right of the URL text field.
- Click the Upload Files button.
- Locate the image on your computer's hard drive.
- Select the image and click Open and the image will automatically upload to your My Files area.
- Select the image you just uploaded and click the Insert Selected button.
- Set your Image Information accordingly.
- Click the OK button to insert the image into your editor window.
- Click the Save
 icon in the upper right corner of your screen to save your work.
Click the Free Images button to browse and use our library of free images.
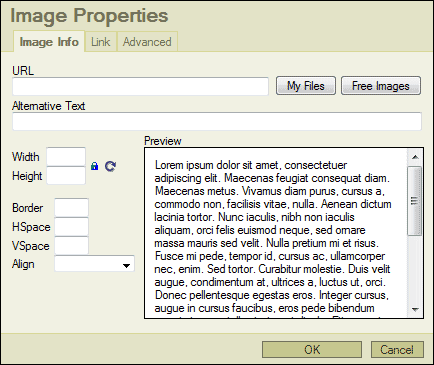
- URL: This is the path to your selected image or file. It will automatically fill in when you select an image or file.
- BROWSE SERVER: This will open the My Files dialog box, allowing you to select an image or file to insert or edit.
- ALTERNATIVE TEXT: This is the text that appears if a user hovers over the image.
- WIDTH: This is the width of the image in pixels.
- HEIGHT: This is the height of the image in pixels.
- LOCK RATIO: The image dimensions are locked by default. This should remain locked if you want your image to resize proportionally upon changing the height or width. For instance, if you just change the height on your image, it will automatically change the width to make the image proportional. Click the lock ratio to unlock the image dimensions. This will allow you to set any value for the height or width without it affecting the other.
- RESET SIZE: Should you update the image dimensions and want to set them back to the original settings, click the Reset Size icon to do so.
- BORDER: You can place a border around the image. The larger the number you choose, the larger the border.
- HSPACE: You can set how much space horizontally you want between an image and text.
- VSPACE: You can set how much space vertically you want between an image and text.
- ALIGN: Allows you to set how you want the image aligned on the page. Aligning an image right or left is a great way to create the effect of wrapping text around your image.
For security reasons, the following file types cannot be uploaded to your My Files area:
.asp, .aspx, .ascx, .bat, .cfc, .cfm, .com, .dll, .exe, .jsp, .php, .pl, .reg, .vbs
 Select the image you would like to link.
- Click the Insert/Edit Image icon to bring up the Image Properties dialog box.
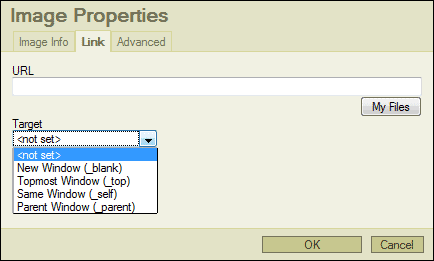
- Click the Link tab.
- Click the My Files button located in the right side of the dialog box.
- Click the Upload Files button.
- Locate the file on your computer's hard drive.
- Select the file and click Open and the image will automatically upload to your My Files area.
- Select the file you just uploaded and click the Insert Selected button.
- Set your link target method accordingly.
- Click the OK button to create the link to your file.
- Click the Save
 icon in the upper right corner of your screen to save your work.
This area allows you to apply more advanced image property settings. These features are not supported by our technical support team.
Note: Please follow all copyright laws. You are responsible for the images on your site.
 Place your cursor in the desired location within your editor window in which to add your image.
 Select the image you would like to link.