Hyperlinks
A hyperlink is a reference from a point in one web site to some point in another web site or another place in the same website. A hyperlink is usually displayed by a distinguishing feature such as a different color, font or style. A user activates the link by clicking on it with their mouse.
Who has access:
You must have one of the checked permissions to use this manager.
Guest
Member
Contributor
Editor
Administrator
Group Contributor

This tool gives you the ability to direct a user on your website to information on another site. For example, if your content includes information about your community and you would like to provide the option for the user to know more, you can add a link to the website of your community's Chamber of Commerce or Visitor's Information Center.
- Use your mouse to highlight the text or image you would like to link.
- Select the Insert/Edit Link icon from the Editor Toolbar.
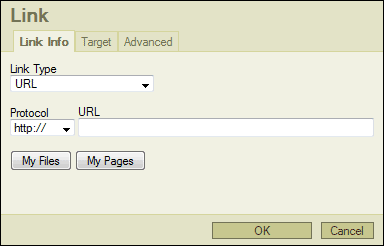
Link Info
- LINK TYPE: Select URL from the drop down menu.
- PROTOCOL: Select the appropriate protocol from the drop down menu. Most of the time you will choose http://.
- URL: Type the address of the Web link (i.e. www.yourdomain.com).
- Select the Target tab next to the Link Info tab at the top of the dialog box.
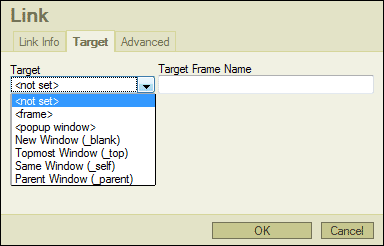
 Target
You can choose the behavior in which your new link opens by selecting a target method.
- FRAME: Opens the link in a frame.
- POPUP WINDOW: Set the link to open in a popup window according to the properties you set for the window.
- NEW WINDOW: Opens the link in a new window.
- TOPMOST WINDOW: Opens the link in a window on top of your current open window, replacing it as the topmost window.
- SAME WINDOW: Opens the link in the same window you are in.
- PARENT WINDOW: Functions the just like Same Window, unless your site is in frames.
- TARGET FRAME NAME: All choices except frame and popup window will be populated with text. Leave the text the application creates in place.
- Click OK to insert your link or Cancel to exit the Insert/Edit Link dialog box.
- Click the Save
 icon in the upper right corner of the screen to save your work.
Advanced
This area allows you to apply more advanced features to your links. These features are not supported by our technical support team.

This allows you to direct your user from the page they are currently viewing to another related piece of content within your site.
- Use your mouse to highlight the text or image you would like to link.
- Select the Insert/Edit Link icon from the Editor Toolbar.
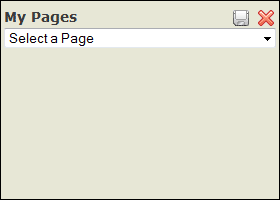
- Click the My Pages button within the Insert/Edit Link dialog box.
- In the My Pages window that appears, select the page, event, resource, group, store item or discussion board you wish to link to.
- Leave Link Type set to "URL" and protocol set to "<other>".
- Set your Target as described in the Target section above.
- Click OK to insert your link or Cancel to exit the Insert/Edit Link dialog box.
- Click the Save
 icon in the upper right corner of the screen to save your work.
 Use your mouse to highlight the text to link.
- Select the Insert/Edit Link icon from the Editor Toolbar.
- Click the My Files button within the Insert/Edit Link dialog box.
- Select your file from the My Files dialog box and click the Insert Selected button.
- The My Files dialog box will close and bring you back to the Insert/Edit Link dialog box.
- Leave the settings in place as they appear.
- Set your Target as described in the Target section above.
- Click OK to insert your link or Cancel to exit the Insert/Edit Link dialog box.
- Click the Save
 icon in the upper right corner of the screen to save your work.

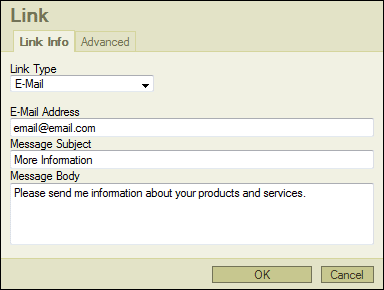
This allows you to create a link that opens an e-mail program with the destination address, message subject and message body already filled in.
- Type in the e-mail address you wish to link and use your mouse to highlight the text.
- Select the Insert/Edit Link icon from the Editor Toolbar
- Link Type: Select E-Mail from the drop down menu
- E-Mail Address: Enter the destination e-mail address. This will automatically be filled in when the user's mail client opens.
- Message Subject: Enter the default message subject. This will automatically be filled in when the user's mail client opens.
- Message Body: Enter the default content of the message. This will automatically be filled in when the user's mail client opens.
- Click OK to insert your link or Cancel to exit the Insert/Edit Link dialog box.
- Click the Save
 icon in the upper right corner of the screen to save your work.
 This tool gives you the ability to direct a user on your website to information on another site. For example, if your content includes information about your community and you would like to provide the option for the user to know more, you can add a link to the website of your community's Chamber of Commerce or Visitor's Information Center.
 This allows you to direct your user from the page they are currently viewing to another related piece of content within your site.
 This allows you to create a link that opens an e-mail program with the destination address, message subject and message body already filled in.